Foam Armature
Tails can be made using a foam armature attached to a little piece of canvas mesh. This creates a tail that is light, springy and holds its shape well. It's excellent for tails that have a curve, like husky tails. For foam, I use air-conditioner weatherseal that comes in 2.5in strips.
Materials:
Foam
Glue Gun
Fur in the colors you're using
Needles+Pins (Sewing and placing the fur)
Thread
String- some sort of strong cord (hemp or linen) or jewelry wire
belt
Sheet of plastic canvas mesh
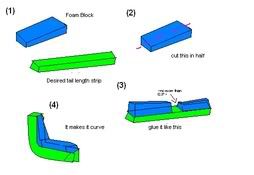
First, you take the foam, and either cut it or paste it into the desired shape. If your foam is in a block, you might trim it into a curved form. If your foam is in strips, layer it. Now, I'm going to go offtopic a little and explain about how I later my foam…
Take a strip that's 2.5in thick (or however thick your foam is) and as long as the desired tail length. Then, form it into a curve, just to see how it looks. After that take another strip, shorter, and cut it in half. Next, take the thinner strips and hot-glue them along the opposite ends of the large tail-foam strip; leave a space no larger than an inch or two between them. To make a curve, you simply stick the ends of the smaller strips together with hot glue. And now trim it so that it looks perfect!
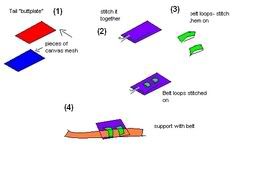
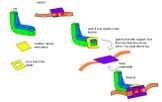
After you've got the foam armature done, you have to make sure that the tail can stay up on your butt. Take two pieces of canvas mesh, and stitch them together with thread or cord or jewelry wire (it's suprisingly strong) to make a reinforced buttplate.Now, take two smaller strips of mesh and make belt-loops: you can hot-glue a cheap belt to it. Then, take another piece of mesh and cut a little square in it. If your foam is squishy, like mine is, you can pull the foam through the hole and hot glue it there, so that it's extra-strong. No more than 2.5“ should poke through. If your foam is more rigid, you could put together a little structure of mesh to hold it. Anyway, you glue down the tailfoam to the mesh plate, then glue the sides of the mesh you pulled the foam through down to the little buttplate. It makes the tail less likely to rip and fall apart. There's probably a better way of doing the support without using slightly flimsy mesh, but it's the only thing that I have to work with.
Then you fur the tail, making sure the fur fits, cutting it and sewing it as necessary to form-fit the tail. Make sure you cut the fur so you can disguise the mesh, which isn't subtle at all. Wearing a long tshirt to go over it would disguise it well. It shouldn't be a problem if you use foam in a full fursuit tail (as long as it has support: otherwise, it would fall and drag down)If the fur is too heavy for the tail, you might have to alter the supports.
I hope I'm clear… This doesn't make the sturdiest tails in existance, but it's okay for my uses and makes a bouncy, springy tail that's perky and cute.
Simple, Cheapo Diagrams:
1) How the Tail is curved http://i20.photobucket.com/albums/b230/Springmoon/yaygraphis.jpg
2) How the mesh support works http://i20.photobucket.com/albums/b230/Springmoon/yaymore.jpg
3) How the extra piece of mesh works and how it's all attached together. http://i20.photobucket.com/albums/b230/Springmoon/yay.jpg